
Customized Solder Holder, Jet Sett, Blast Shield
5 Minute Read

Steve Satow shares his procedure for customized solder holder and blast shield, and how to make using a Jet Sett easier with a melter and holder.
Solder Holder
When I was in school we used to do a lot of sterling silver soldering. I got into the habit of polishing the tarnish off my solder before precutting each dwt into 3 different sizes: small, medium and large and keeping the pieces in small covered tins.
This kept the different temperature solders separate and kept them from re-tarnishing before I could use them. To me it seemed silly to clamp a tarnished piece of solder into a tight, pinched fit joint and heating it in an oxygen rich atmosphere and hope that the drop of flux I had on the joint would clean off the tarnish and render a pit free joint.
I had more pit free joints than the rest of the class and soon others were polishing their solder as well. When I started doing my gold soldering I just kept up the habit with the same success rate and still do to this day. If we look at how many solder joints we get from one dwt of solder it takes less time to polish that new piece of solder before I clip it than to redo just I joint that has pits in it. I started using small round plastic watch makers parts trays with 12 compartments to separate my solder and keep it clean and tarnish free on my bench top.
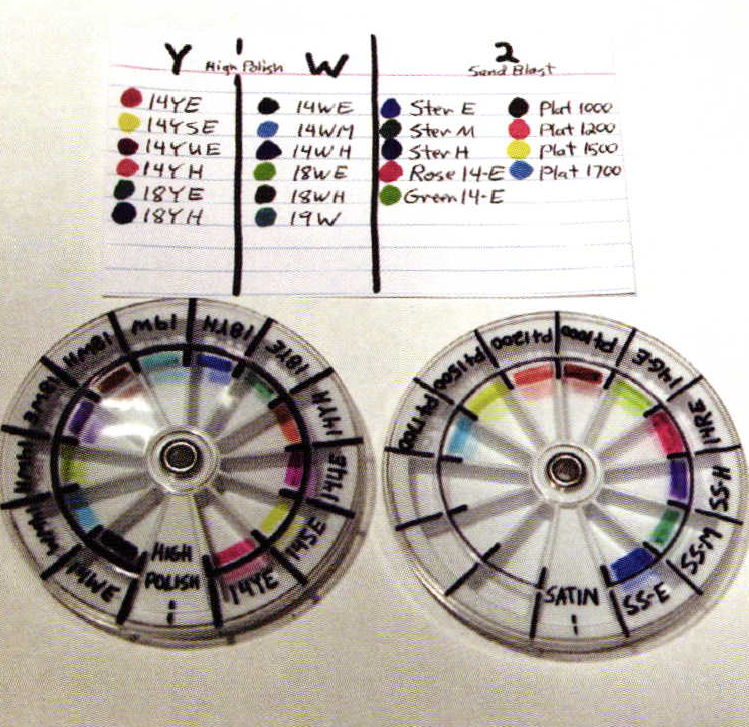
One day it got knocked off my bench and hit the floor hard enough to break and mix l2 dwt of solder into an inseparable mess. Then I read where a jeweler used a sharpie to color his solder before clipping it to keep it separated on his solder pad. That didn't work for me because sharpie only had 8 colors and I had 12 different kinds of solder to mark. Then sharpie came out with a 12 pack of different colors and I was in business. I used his great idea with my polished solder and solder holder. Now because I use more than 12 kinds of solder for the second solder tray, after cleaning the solder and before clipping it, I satin finish each of them so I can reuse the same color of sharpie and be able to tell at a glance which is which. So far it has worked perfectly.
Make a reference chart on a post card of what colors go with what solder. Then mark your plastic trays to divide them and color-code them. If you snip your solder into a 2-liter plastic jug with the bottom cut off you're not chasing all the stray pieces. When you're done, tip it up and unscrew the plastic cap and pour the chips into the tray.
Jet Sett Melter
Most of us who use Jet Sett probably use this Rival Hot Pot Express, or something similar, to warm the Jet Sett. The factory rep showed me that you could just throw a handful into the water, wait a few minutes, reach in and gather it up and squeeze it into a hot pliable ball. I hate chasing all the loose pieces around in the hot water. Plus many of the pieces go grainy and get ruined if they get too hot. The 160° water isn't the most pleasant thing to keep your hand in while you gather it and rubber gloves take too long.
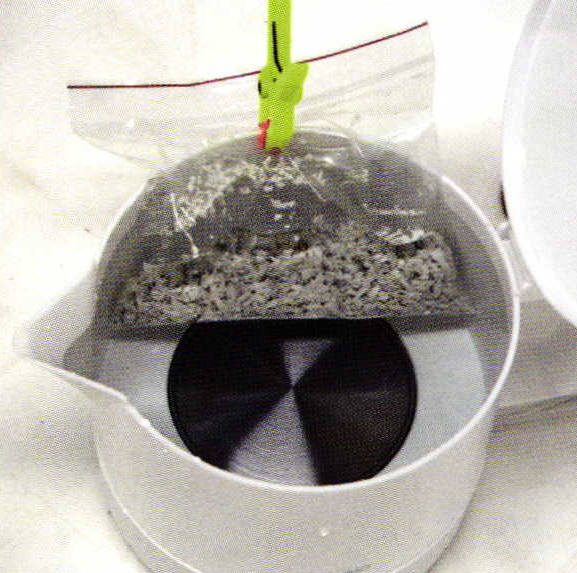
Take a plastic bag and throw in a handful of Jet Sett and some water until the water is higher than the Jet Sett. Close the bag with a small plastic clip and clip the bag so it is suspended at least 1 inch above the bottom. The bag acts like a soft-sided double boiler.
To check it you pull out the bag and squeeze it. If it's ready it's soft and pliable and easily balls up with out chasing every little piece. One of the things that seems to ruin Jet Sett, besides water that is above 160°, is the rouge on our fingertips that smudges off on to it.
Rouge on the surface of it makes it hard to reform it into a ball as it makes the seams not blend together so I usually have to wash my hands before handling it with the bag you can ball it up with dirty hands and push it into the holder and set your ring into it with out having to touch it. Then cool the item and it doesn't smudge as easily when handled.
Jet Sett Holder
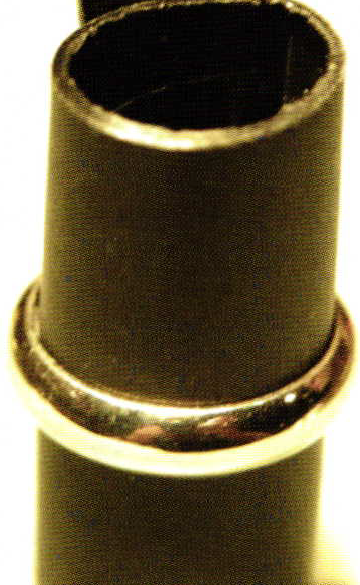
Jet Sett is a wonderful product but it has drawbacks. The time it takes to get soft is one of them and if you have only one holder it costs a production setter a lot of waiting time. If it comes in contact with the heating element at the bottom of the warmer and it gets too hot, it's ruined. 160° is the maximum heat you want it to reach.
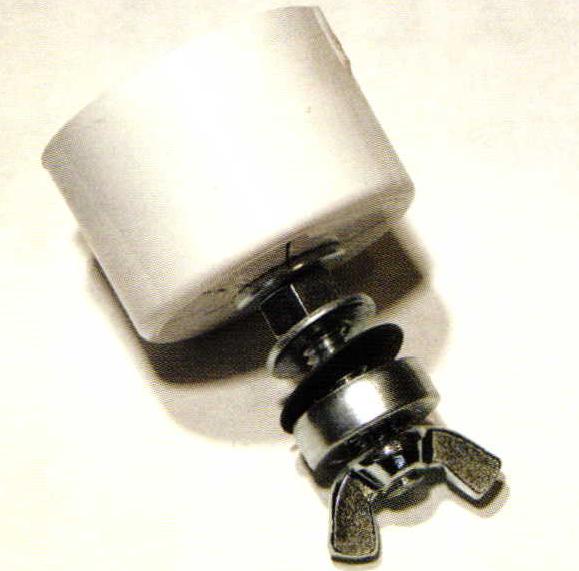
When you use a holder like this, the PVC touches the bottom of the warmer and insulates the jet sett. This unit costs less than $2.00 and allows you to make enough of them that you are never waiting on the warming pot to soften up the Jet Sett to insert or remove a ring. You can have 5 or 6 in there at once. The unit is made from a 1″ PVC end cap, 1 3/8 inch x 2 inch coarse thread bolt (stainless is best), 2 3/8 inch washer, 1 3/8 inch wing nut, and a 1 3/8 inch standard nut.
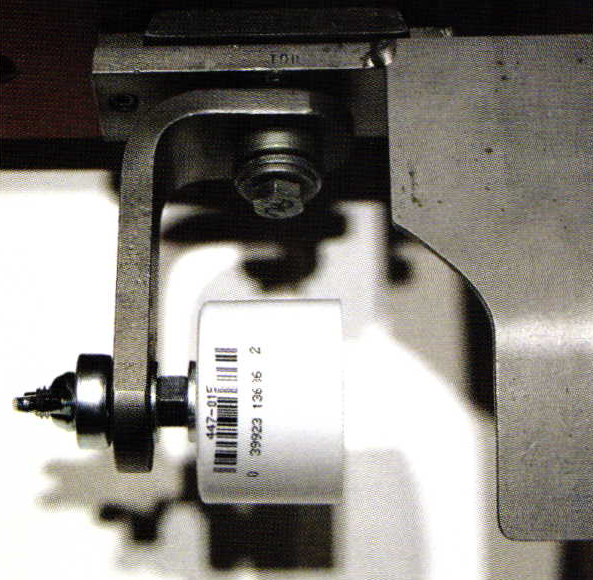
This side view shows what the completed unit looks like. Drill the center of the end cap with a 3/8 inch drill. Place the bolt with the bold head inside the cap. Slip the washer over the bolt and install the 3/8 inch nut, then tighten as snug as possible. The second washer goes between the nut and the bench mate arm.
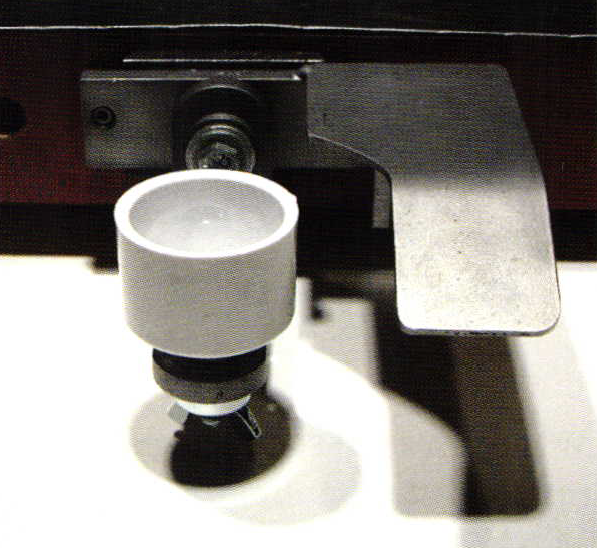
The compression washer that you removed when you took apart the bench mate arm goes on the other side of the bench mate arm, then the bearing, then and the wing nut. It is made to fit on the bench mate arm after you turn it sideways. If you don't have a bench mate you can drill a new bench pin with a 3/8 inch drill with the flat side up. The unit allows you to have both hands free to do your setting.
Blast Shield
Want a really fast reusable mask for the inside of rings to be sand blasted or bead blasted? Take a black film canister, remove the top, and cut off the bottom. Curl it up and slip it inside a ring. Make one for men's sizes and one for ladies sizes.
Leave a small amount of overlap on each one like pictured. This not only keeps the sand or beads from texturing the polished surface inside the ring, but also allows you to hold rings easier with the gorilla gloves most blast cabinets have.
You assume all responsibility and risk for the use of the safety resources available on or through this web page. The International Gem Society LLC does not assume any liability for the materials, information and opinions provided on, or available through, this web page. No advice or information provided by this website shall create any warranty. Reliance on such advice, information or the content of this web page is solely at your own risk, including without limitation any safety guidelines, resources or precautions, or any other information related to safety that may be available on or through this web page. The International Gem Society LLC disclaims any liability for injury, death or damages resulting from the use thereof.
Related Articles

How to Modify Prong Pushers
Modified Super Tools

Using Non-Jeweler’s Tools For Fabrication: How To Repurpose Painting Blades For Bezels
Basic Principles for Tools and Equipment


The All-In-One Jewelry Making Solution At Your Fingertips
When you join the Ganoksin community, you get the tools you need to take your work to the next level.

Trusted Jewelry Making Information & Techniques
Sign up to receive the latest articles, techniques, and inspirations with our free newsletter.